This is default featured slide 1 title

Go to Blogger edit html and find these sentences.Now replace these sentences with your own descriptions.

This is default featured slide 2 title

Go to Blogger edit html and find these sentences.Now replace these sentences with your own descriptions.

This is default featured slide 3 title

Go to Blogger edit html and find these sentences.Now replace these sentences with your own descriptions.

This is default featured slide 4 title

Go to Blogger edit html and find these sentences.Now replace these sentences with your own descriptions.

This is default featured slide 5 title

Go to Blogger edit html and find these sentences.Now replace these sentences with your own descriptions.

Tuesday, August 28, 2018

How to reduce the size of a photo file without reducing the resolution

This software serves to reduce the size of the photo file, but the resolution remains. If some time ago I shared how to reduce the size of a photo by reducing the resolution and the quality remains here, this time is the opposite, the resolution is fixed but the quality is reduced. The following is the appearance of the FREE software that I use:


For how to use it very easily, please pay attention to the picture below:

  1. Click the folder icon at the top to take photos that will be reduced in size.
  2. Set the quality to 50% (Adjust to your needs, the smaller the worse)
  3. Set the Output Folder again (The file size is minimized)
  4. Click the Compress button! to start the compression process.
  5. Wait until it's finished and no longer ... the file size will definitely be much reduced
 This is the example I tried, this is the size of the original photo:

From the picture above we can see the photo file size of 4.46 MB. Here's the size of the photo file after I compress:


Only 879 KB Very small isn't it ??? Oh yeah, actually, if you pay attention it won't look too different in quality, but I don't recommend this method in the photo file that will be used in graphic design because the resolution will be very influential when the image will be enlarged in the design later.

For those who want to try this software please download by clicking the link below:


Extreme ways to reduce the size of the video file without reducing quality

Handbrake is the best free software that works to convert your video file size to very small without reducing its quality.

Here are tips on how to reduce the size of your video without reducing the quality of the video. Oh, yeah, this post I say is extreme because the reduced size of the video is very far from the size of the original video.


Well before we start with the following method the original size of the video that I used as an example this time is 180MB:

Here's how to reduce the size of the video file using Handbrake:
  1. Open the Handbrake software and click File Oa single video file to open the video file that you want to reduce the size or you can also drag and drop it into the box that I marked with the red line to insert the video.


  2. After that, check Web Optimized and click the Browse button to determine the video storage location that has been reduced.


  3. Please name your video file and the Save button


  4. Next step is click start to start the process


  5. Convert reduction process will run


  6. After the process is complete, we now see the size of the video that has been reduced

  7. Tarrrrraaaaa ... well here we can see that the original 180 MB video is only 25.6 MB. Wooooow .... How are you interested in trying this method with Handbrake Software ??? Please follow the methods as above. in fact there are many other settings that you can try it yourself to get the video settings and quality you want.

    The last for those of you who want to download the Handbrake Software please click on the download link below and according to the operating system you are using:
    HANDBRAKE WINDOWS
    HANDBRAKE MAC OS

    For Linux Ubuntu, you can see how to install it here

How to reduce the size of the photo without reducing its quality

PhotoRazor  is a very small software that functions to reduce the size of a photo file without reducing its quality. This is certainly very important when we want to share photos with others via the internet.

In addition to changing the size of photos to be small, of course this also reduces the size of the file so it is easier to email and share with friends and family. The following shows:


How to use this program is very easy. Note the initial image below:


Now, after I slide the Maximum Width / Height to the left and Picture Quality to the right, the image becomes like this:


From here friends can see that even though the picture is minimized but the quality is maintained. The next step, pay attention to the picture below:

Jika hanya 1 foto yang anda kecilkan maka pilih option Selected Photos tetapi  jika foto yang mau dikecilkan semuanya yang ada di dalam 1 folder maka pilih All 7 Photos. Untuk memulai proses pengecilan ukuran foto, silahkan klik tombol Resize Photos Now.

After the size reduction process is complete, please click the small button with the yellow image (next to the Resize Photos Now button) to see the results of the photo. Oh yes, with this program you don't need to be afraid of the original file changing or corrupting because this program will automatically duplicate it and place it in a folder on drive D (adjusted to the drive name on the PC of friends but what is clear is not on drive C) with the name "Small photos". For more details, note the picture below:

For friends who need this program or just want a collection, please download the link below:

PhotoRazor ( 935 KB )

Friday, October 28, 2011

Mini Browser

Mini Browser adalah sebuah browser mini yang dapat menampilkan tampilan dari beberapa situs seperti tampilan di handphone sehingga pastinya lebih cepat sekalipun koneksi internet lambat, jadi bagi anda yang suka facebook-an atau membaca berita-berita terbaru di internet tidak perlu kuatir. Oh iya kalau ada yang bilang kan bisa pakai HP, yah itu tdk masalah karena postingan ini hanya sekedar memberi info dan ditujukan bagi yang suka online di PC/Laptop OK ^_^ . Berikut ini tampilan programnya pada saat aku buka facebook:

Oh iya selain www.facebook.com, ada juga beberapa situs lain yang dapat anda buka dengan browser ini. Berikut ini ada 2 contohnya:


Nah itu kira-kira sekilas tentang program Mini Browser. Oh iya, bagi siapa saya yang ingin coba program ini silahkan download di link di bawah ini:

Mini Browser (6 MB)

Mudah-mudahan program bisa membantu anda di saat koneksi internet anda sedang lambat ^_^

(sumber: http://rudymaturbongs.blogspot.com)

Mewarnai v1 Portable

Kalau beberapa waktu lalu aku pernah share tentang program sejenis ini yaitu IColor Toons  dan Agil's Cloloring Book  maka pada postingan kali ini adalah giliran program Mewarnai v1 Portable yang aku share. Berikut ini tampilan programnya :


Dalam program ini terdapat 30 template gambar yang dapat dipilih untuk diwarnai. Selain 30 gambar tadi, anda juga dapat memasukkan gambar anda sendiri untuk diwarnai tetapi  idealnya gambar harus hitam putih dan ukurannya  446 x 384. Oh iya sesuai dengan judul postingan di atas yaitu Portable alias tidak perlu diinstall. Berikut ini contoh gambar yang sudah diwarnai :

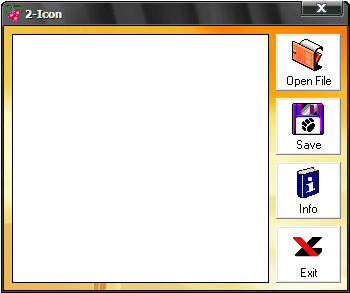
2-Icon Portable

2-Icon merupakan sebuah program sangat sederhana yang berfungsi untuk mengubah file BMP, JPG atau GIF ke format icon (ICO) dengan ukuran 32x32. Berikut ini tampilannya:


Nah kalau dilihat dari tampilannya aku yakin siapa saja tidak akan mengalami kesulitan menggunakan program sederhana ini. Berikut ini contoh sebuah file gambar yang akan aku ubah dari JPG ke ICO.

Sunday, June 26, 2011

Timer Shutdown

Well, from the name alone it must have been discovered that this program can be used to turn off the computer according to the time we have set. Here's how it looks:


This simple program is actually a lot of benefits, if Proser itself often uses this program when downloading the Complete program in the middle of the night or at dawn, just set the right time and then just sleep ... when the downloaded file is complete, the computer will die itself a few moments later according to the estimated time we have set with this program.

How to use this program is very easy, you just need to click the Specify Time column and set the time according to the recommended time format. For more details, please see the picture below:


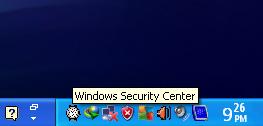
Well ... after the time is determined, click the OK button and the last click the Save button. The program will automatically activate. You can see the program in Tray Icon:


For those who want to try, just download this program here. (Only 85 KB)